Sending Photos
Note: Bulk Texter Pro currently only supports sending photos via Google Voice – not via iMessage.
You can use Bulk Texter Pro to send photos via either the Form Entry tab or the CSV Upload tab.
Sending photos via local file upload
By default, sending photos via local file upload is enabled. This is the most reliable way to send photos with Bulk Texter Pro.
Clicking the Upload Photo button or dragging a photo onto the upload area will store the photo in Bulk Texter Pro, and Bulk Texter Pro will then upload a copy of the photo to Google Voice with each text it sends in that batch.
Switching from sending via Google Photos to local file upload
If you currently have Bulk Texter Pro set to send via Google Photos, you'll need to toggle the relevant option in the Bulk Texter Pro settings tab. To do this, click the account menu at the top right of Bulk Texter Pro, then click Settings.
Then, uncheck the option in the popup to enable sending photos via Google Photos.
Additional tips for local file upload
- Google Voice only allows images up to 2 MB in size. If your image is larger than that, Bulk Texter Pro will resize it automatically.
Sending photos via Google Photos
Note: Sending photos via Google Photos is considered experimental functionality. It is not as stable or reliable as sending photos via local file upload, which is enabled in Bulk Texter Pro by default.
Step 1: Enable sending photos via Google Photos
To send photos via Google Photos, you'll need to toggle on the relevant option in the Bulk Texter Pro settings tab. To do this, click the account menu at the top right of Bulk Texter Pro, then click Settings.
Then, check the option in the popup to enable sending photos via Google Photos.
Step 2: Upload your photos to Google Photos
Due to limitations with Google Voice, Bulk Texter Pro can only send photos that have been uploaded to your Google Photos account.
Any photos you want to send will need to first be uploaded to Google Photos in the same Google account as the Google Voice account that you are using with Bulk Texter Pro.
Step 3: Send the photos
Navigate to either the Form Entry tab or the CSV Upload tab in Bulk Texter Pro. A Choose Photo button will now be visible. Click it, and it will allow you to select a photo to send from your Google Photos account.
If you want to send multiple photos, you will need to schedule multiple texts.
The photo that you attach will show up in the message preview section as well as the History tab.
Sending a distinct photo with each text
If you'd like to send a distinct photo with each text, you'll need to use the CSV Upload tab. This is currently only supported when sending via Google Photos, and is not supported when sending photos via local file upload.
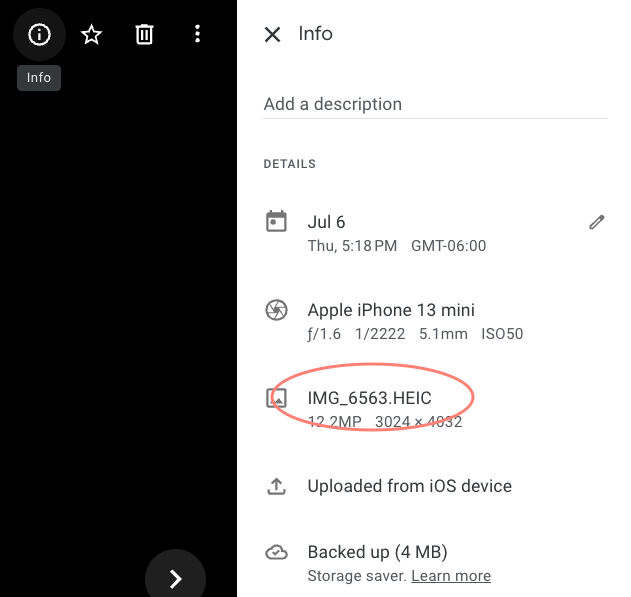
Add a column titled PhotoFileName to your CSV. The file name value in each row should match what shows up when you click the "Info" button on a picture in Google Photos.

If you are uploading photos from a computer, the file names in Google Photos will match the original file names on your computer.
If you are a teacher, for example, you could:
- Generate a unique photo for each student named
test_score_{student_id}.png, where the student's id is part of each file name. - Upload all the photo files to your Google Photos account.
- In your CSV, add
test_score_{student_id}.pngto thePhotoFileNamecolumn for each student. - When you send your texts via Bulk Texter Pro, each student will receive the unique photo you generated for them.
Additional tips for sending via Google Photos
- Google Voice only allows images up to 2 MB in size, even via Google Photos. If the image you select is too large, Google Voice will not send it.
- If your Google Workspaces admin has disabled usage of Google Photos on your account, this option will not work.
If you have feedback to share about this functionality, reach out to [email protected].